
preloading이란 말 그대로 미리 로딩을 해놓는 것이다. 컴포넌트와 이미지에 대해 preloading을 할 수 있는데 하나씩 알아보도록 하겠다.
컴포넌트 preloading
가령, 아래와 같이 최적화를 위해 어떤 컴포넌트를 lazy 로딩 처리 했다고 가정해보자
1
2
3
4
5
6
7
8
9
10
11
12
13
14
15
16
17
18
19
20
21
22
23
import { useState, Suspense, lazy } from 'react';

const LazyModal = lazy(() => import('./components/Modal'));

const App = () => {
  const [showModal, setShowModal] = useState(false);

  return (
    <div className='App'>
      <Suspense fallback={null}>
        {showModal ? (
          <LazyModal
            closeModal={() => {
              setShowModal(false);
            }}
          />
        ) : null}
      </Suspense>
    </div>
  );
}

export default App;
이렇게 할 경우 최초 화면에 접속했을 땐 모달 관련 파일은 바로 다운로드 받지 않고 showModal 상태의 변경에 따라 모달이 보여질 때 해당 리소스를 서버로부터 받을 것이다. 최적화는 되어 있지만 만약 해당 모달 컴포넌트가 복잡하거나 용량이 크다면 사용자가 모달 오픈 버튼을 눌렀을 때는 오히려 사용자 경험이 더 안좋아 질것이다.
그렇다면 어떻게 해결해야 할까?
이 때 preloading을 사용하는 것이다. 지금 생각해 볼 수 있는 방법은 2가지 정도다.
버튼에 마우스를 올렸을 때 로딩
1
2
3
4
5
6
7
8
9
10
11
12
13
14
15
16
17
18
19
20
21
22
23
24
25
26
27
28
29
30
31
32
33
34
35
import { useState, Suspense, lazy } from 'react';

const LazyImageModal = lazy(() => import('./components/ImageModal'));

const App = () => {
  const [showModal, setShowModal] = useState(false);

  const handleMouseEnter = () => {
    import('./components/ImageModal');
  };

  return (
    <div className='App'>
      <button
        onClick={() => {
          setShowModal(true);
        }}
        onMouseEnter={handleMouseEnter}
      >
        모달 오픈
      </button>
      <Suspense fallback={null}>
        {showModal ? (
          <LazyImageModal
            closeModal={() => {
              setShowModal(false);
            }}
          />
        ) : null}
      </Suspense>
    </div>
  );
}

export default App;
컴포넌트가 마운트 되었을 때 로딩
1
2
3
4
5
6
7
8
9
10
11
12
13
14
15
16
17
18
19
20
21
22
23
24
25
26
27
28
29
30
31
32
33
34
35
36
import { useState, Suspense, lazy, useEffect } from 'react';

const LazyImageModal = lazy(() => import('./components/ImageModal'));

const App = () => {
  const [showModal, setShowModal] = useState(false);

  useEffect(() => {
    import('./components/ImageModal');
  }, []);

  return (
    <div className='App'>
      <button
        onClick={() => {
          setShowModal(true);
        }}
        onMouseEnter={handleMouseEnter}
      >
        모달 오픈
      </button>
      <Suspense fallback={null}>
        {showModal ? (
          <LazyImageModal
            closeModal={() => {
              setShowModal(false);
            }}
          />
        ) : null}
      </Suspense>
    </div>
  );
}


export default App;
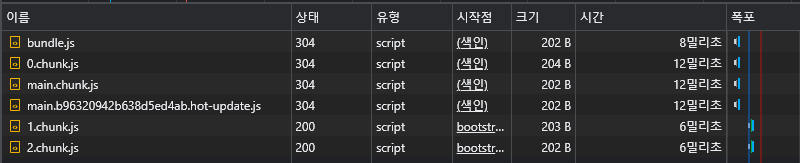
이렇게 했을 경우 주요 파일들이 모두 로드되고 난 이후 모달 관련된 1.chunk.js, 2.chunk.js가 차례대로 로딩 되는 것을 알 수 있다.
지금은 하나의 컴포넌트만 preloading 하니까 괜찮지만 나중엔 더 많은 컴포넌트들을 preloading 시켜야할 때가 올것이다. 이 때 매번 import를 하면 불편하므로 별도의 함수를 만들어서 더 쉽게 관리해보자!
1
2
3
4
5
6
7
8
9
10
11
12
13
14
15
16
17
18
19
20
21
22
23
24
25
26
27
28
29
30
31
32
33
34
35
36
37
38
39
40
41
import { useState, Suspense, lazy, useEffect } from 'react';

const lazyWithPreload = importFunction => {
  const Component = lazy(importFunction);
  Component.preload = importFunction;

  return Component;
};

const LazyImageModal = lazyWithPreload(() => import('./components/ImageModal'));

const App = () => {
  const [showModal, setShowModal] = useState(false);

  useEffect(() => {
    LazyImageModal.preload();
  }, []);

  return (
    <div className='App'>
      <button
        onClick={() => {
          setShowModal(true);
        }}
      >
        모달 오픈
      </button>
      <Suspense fallback={null}>
        {showModal ? (
          <LazyImageModal
            closeModal={() => {
              setShowModal(false);
            }}
          />
        ) : null}
      </Suspense>
    </div>
  );
};

export default App;
이미지 preloading
이미지는 기본적으로 화면에 보여지는 시점이 아니면 로드가 되지 않는다. 그렇다면 어떻게 preloading을 할 수 있을까? 바로 자바스크립트의 Image객체를 사용하는 것이다.
1
2
3
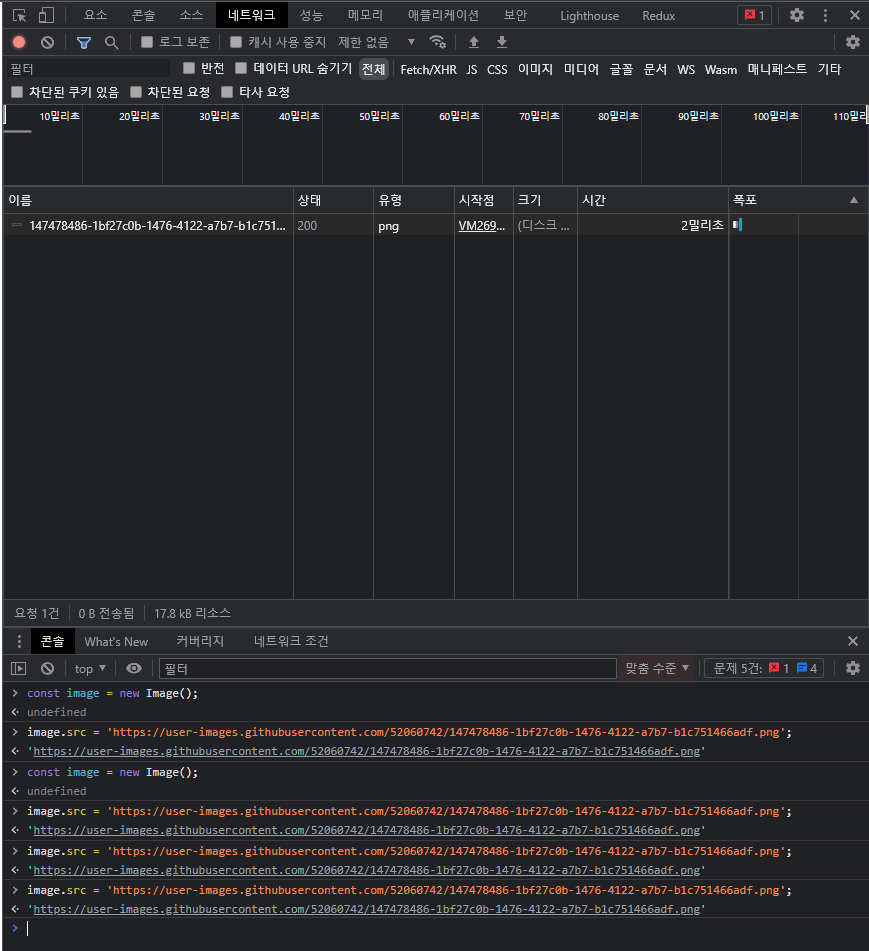
const image = new Image();
image.src = '이미지의 주소';
이렇게 image.src에 값을 지정해주는 순간 Network 탭을 보면 이미지를 불러오는 것을 알 수 있다.
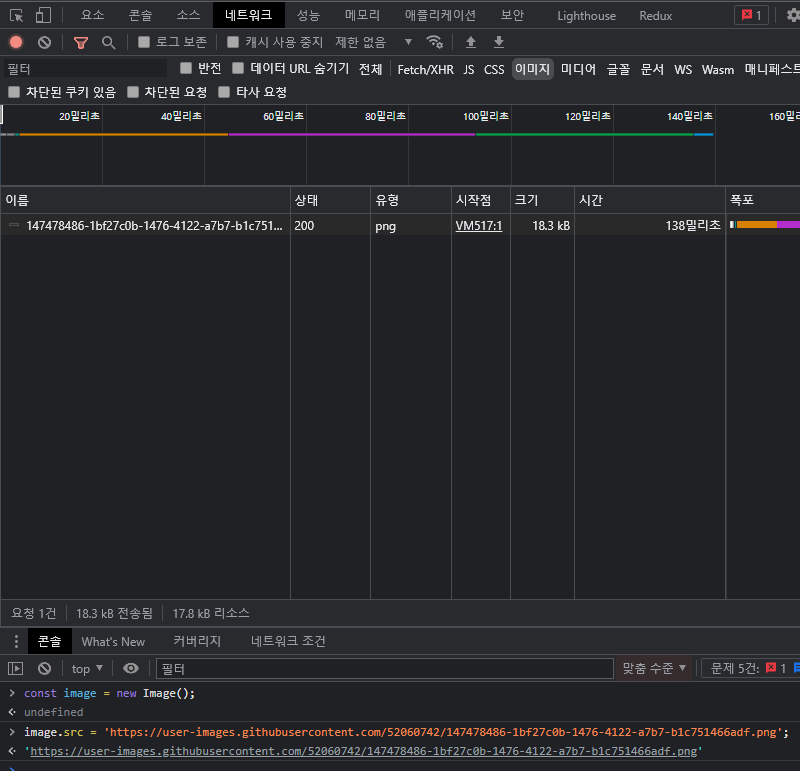
한 가지 주의해야할 점은 컴포넌트와 다르게 이미지는
image.src로 같은 이미지를 불러와도 네트워크 요청은 또 보낸다는 것이다. (내가 배운 내용에서는 이렇게 설명했지만 실제로 테스트를 해보니 여러번 호출하여도 한 번만 불러왔다. 일단 더 찾아보고 이에 대한 설명도 작성해보겠다.)